Chocolate-Covered 7-Minute Microwave Caramels
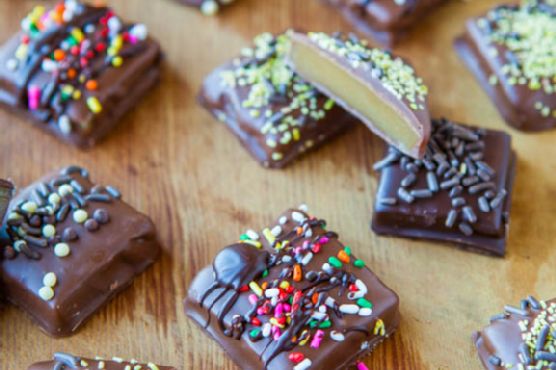
Chocolate-Covered 7-Minute Microwave Caramels is a gluten free recipe with 36 servings. For 32 cents per serving, this recipe covers 1% of your daily requirements of vitamins and minerals. One serving contains 100 calories, 0g of protein, and 4g of fat. A mixture of sweetened condensed milk, sprinkles, granulated sugar, and a handful of other ingredients are all it takes to make this recipe so yummy. 47598 people have made this recipe and would make it again. From preparation to the plate, this recipe takes approximately 27 minutes. It works well as a very reasonably priced hor d'oeuvre. It is brought to you by Averie Cooks. Overall, this recipe earns an improvable spoonacular score of 2%. If you like this recipe, take a look at these similar recipes: Easy 6-Minute Microwave Caramels, 7 Minute Microwave Caramels Or Caramel Corn, and Seven Minute Microwave Caramels (gluten-free).
Servings: 36
Preparation duration: 20 minutes
Cooking duration: 7 minutes
Ingredients:
1/2 cup light corn syrup (light in color, not lite)
chocolate for dipping - I used about 4 ounces each of Milk (32%), Dark (54%), and Darker (72%)
1/2 cup granulated sugar
1/2 cup light brown sugar, packed
1/2 cup butter (1 stick), melted (I use unsalted, use salted for saltier caramels)
sprinkles (or jimmies, non-pareils, slivered almonds, coarse sea salt, graham cracker crumbs, etc.), optional for sprinkling
1/2 cup sweetened condensed milk
1 1/2 teaspoons vanilla extract
1 to 4 tablespoons vegetable shortening, optional but recommended
Equipment:
aluminum foil
microwave
oven mitt
bowl
frying pan
paper towels
cutting board
knife
Cooking instruction summary:
This is a fast-moving recipe once it begins. Have everything in place including a large oven mitt because the bowl becomes extremely hot. Make sure your bowl is truly microwave-safe because it will get very hot. Clear out a space in your refrigerator in advance for placing the hot pan to cool. Do not use lite or reduced fat ingredients; use real butter, corn syrup, and sweetened condensed milk. Send small children out of the kitchen while making these and fully concentrate on the recipe because the mixture is incredibly hot. Line an 8-inch or 9-inch square pan with non-stick aluminum foil, and spray very generously with cooking spray; set aside. (For these, I used a 9-inch pan; for the previous recipe I used an 8-inch). In a very large microwave-safe bowl (nearly the largest your microwave can accommodate because the depth is necessary for the bubbling-up), melt the butter, about 90 seconds. To the melted butter, add the sugars, corn syrup, sweetened condensed milk, and stir until smooth. Place bowl in the microwave and heat on high power for 3 minutes and 30 seconds (3 and 1/2 minutes). Using a hot pad, remove bowl from the microwave, scrape down the sides incredibly well, and stir. Very important - it won’t appear that much of anything is on the sides but if there is sugar or sugar granules that are not dissolved and fully incorporated into the bubbling mixture and they remain uncooked, they can cause graininess or crystallization in the finished caramels. Uncooked sugar crystals have regrowth that spreads and can take over a whole pan, rendering it a grainy and inedible. After scraping down the sides of the bowl very well, wipe around the sides using a damp paper towel, making sure no sugar granules are clung to the sides. Return bowl to microwave and heat on high power for 3 minutes and 30 seconds (3 and 1/2 minutes). During this time, the mixture will foam, bubble vigorously, and become very active. I recommend standing in front of the microwave and watching it the whole time so you could power off the microwave immediately if necessary. Using a hot pad, remove the bowl from the microwave. Very carefully add the vanilla extract, standing at arm's length. The mixture will likely still be boiling when you add it, it will bubble up even more. Use extreme caution and stir to incorporate the vanilla as the mixture continues to bubble quite rapidly. Pour the bubbling mixture into the prepared pan, cover pan with aluminum foil, and place it in the refrigerator to firm up for at least four hours, or overnight, before slicing caramels. Lift the caramels out using the foil overhang and flip them over, upside-down-cake style, onto a piece of parchment on top of the cutting board. Spray knife or pizza wheel with cooking spray before slicing, repeating as necessary. I made 6 rows of 6, for 36 caramels. Melt chocolate in a small microwaves-safe bowl, about 1 minute. Stir in 1 to 2 tablespoons shortening for every 4 to 6 ounces of chocolate. This helps keep the chocolate smoother and less prone to becoming gloppy or firming up too fast. I like to work in batches of 4 to 6 ounces of melted chocolate at a time. Balance 1 caramel on the tines of a fork, slowly lower it into the chocolate, and dip to coat. Don't let it linger in the hot chocolate or it could melt the caramel, and more chocolate than necessary is used. Use another fork to help lift it out of the chocolate and slide it off the fork and onto a parchment-lined large plate. Add sprinkles before chocolate sets up. Repeat process with all remaining caramels, reheating or adding more chocolate and shortening as necessary. Place caramels in the refrigerator to firm up for at least 2 hours, or overnight. Caramels will keep airtight in the refrigerator for many months. I prefer to store them in the fridge rather than at room temperature. Note that because microwaves, ingredients, and climates vary, there could be variances in cook times; for my microwave 7 minutes is perfect.
Step by step:
1. This is a fast-moving recipe once it begins. Have everything in place including a large oven mitt because the bowl becomes extremely hot. Make sure your bowl is truly microwave-safe because it will get very hot. Clear out a space in your refrigerator in advance for placing the hot pan to cool. Do not use lite or reduced fat ingredients; use real butter, corn syrup, and sweetened condensed milk. Send small children out of the kitchen while making these and fully concentrate on the recipe because the mixture is incredibly hot. Line an 8-inch or 9-inch square pan with non-stick aluminum foil, and spray very generously with cooking spray; set aside. (For these, I used a 9-inch pan; for the previous recipe I used an 8-inch). In a very large microwave-safe bowl (nearly the largest your microwave can accommodate because the depth is necessary for the bubbling-up), melt the butter, about 90 seconds. To the melted butter, add the sugars, corn syrup, sweetened condensed milk, and stir until smooth.
2. Place bowl in the microwave and heat on high power for 3 minutes and 30 seconds (3 and 1/2 minutes). Using a hot pad, remove bowl from the microwave, scrape down the sides incredibly well, and stir. Very important - it won’t appear that much of anything is on the sides but if there is sugar or sugar granules that are not dissolved and fully incorporated into the bubbling mixture and they remain uncooked, they can cause graininess or crystallization in the finished caramels. Uncooked sugar crystals have regrowth that spreads and can take over a whole pan, rendering it a grainy and inedible. After scraping down the sides of the bowl very well, wipe around the sides using a damp paper towel, making sure no sugar granules are clung to the sides. Return bowl to microwave and heat on high power for 3 minutes and 30 seconds (3 and 1/2 minutes). During this time, the mixture will foam, bubble vigorously, and become very active. I recommend standing in front of the microwave and watching it the whole time so you could power off the microwave immediately if necessary. Using a hot pad, remove the bowl from the microwave. Very carefully add the vanilla extract, standing at arm's length. The mixture will likely still be boiling when you add it, it will bubble up even more. Use extreme caution and stir to incorporate the vanilla as the mixture continues to bubble quite rapidly.
3. Pour the bubbling mixture into the prepared pan, cover pan with aluminum foil, and place it in the refrigerator to firm up for at least four hours, or overnight, before slicing caramels. Lift the caramels out using the foil overhang and flip them over, upside-down-cake style, onto a piece of parchment on top of the cutting board. Spray knife or pizza wheel with cooking spray before slicing, repeating as necessary. I made 6 rows of 6, for 36 caramels. Melt chocolate in a small microwaves-safe bowl, about 1 minute. Stir in 1 to 2 tablespoons shortening for every 4 to 6 ounces of chocolate. This helps keep the chocolate smoother and less prone to becoming gloppy or firming up too fast. I like to work in batches of 4 to 6 ounces of melted chocolate at a time. Balance 1 caramel on the tines of a fork, slowly lower it into the chocolate, and dip to coat. Don't let it linger in the hot chocolate or it could melt the caramel, and more chocolate than necessary is used. Use another fork to help lift it out of the chocolate and slide it off the fork and onto a parchment-lined large plate.
4. Add sprinkles before chocolate sets up. Repeat process with all remaining caramels, reheating or adding more chocolate and shortening as necessary.
5. Place caramels in the refrigerator to firm up for at least 2 hours, or overnight. Caramels will keep airtight in the refrigerator for many months. I prefer to store them in the fridge rather than at room temperature. Note that because microwaves, ingredients, and climates vary, there could be variances in cook times; for my microwave 7 minutes is perfect.
Nutrition Information:
covered percent of daily need
